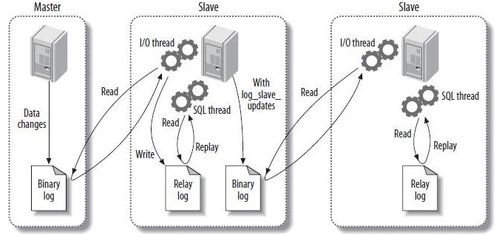
Introduction:
The art of fly fishing is a blend of skill, patience, and precision. One of the most crucial elements in this craft is the setup of the line and leader, particularly the insertion of the float (or indicator) at the right place. This article aims to provide a detailed guide on how to effectively insert your float into the fishing line, complete with step-by-step illustrations to ensure a clear understanding.
Understanding the Components:
Before diving into the technique, it's essential to understand the components involved:
- Fly Line: The main line used in fly fishing, designed to cast the fly effectively.
- Leader: A section of monofilament or fluorocarbon line that connects the fly line to the fly. It's typically tapered to reduce visibility and resistance.
- Tippet: The smallest section of the leader that terminates in the fly. It's often a finer diameter than the leader for better fly presentation.
- Float (Indicator): A buoyant device used to detect the take of the fish by observing its movement on the water's surface.
Step-by-Step Guide to Inserting the Float:

Prepare Your Materials: Ensure you have all the necessary components ready: your fly line, leader, tippet, and float.
Attach the Float to the Leader: a. Begin by attaching the float to the end of your leader. You can use a blood knot or a loop-to-loop connection for this purpose. b. Make sure the knot is secure and tight. The float should sit at the desired depth on the leader, which can vary depending on the type of fishing and water conditions.
Prepare the Fly Line: a. Strip the fly line to expose a length that is slightly longer than the leader and float combined. b. Ensure there are no kinks or twists in the line, as these can affect casting and performance.
Forming the Loop: a. Take the end of the fly line and form a loop by making a simple overhand knot. b. The loop should be large enough to comfortably fit over the end of the leader.
Inserting the Float: a. Hold the loop in one hand and the end of the leader with the float in the other. b. Position the loop over the float, ensuring that the knot at the end of the leader is above the float. c. Slide the loop down the leader until it snugly fits over the float. The loop should not be too tight, as this can damage the float or leader.
Securing the Connection: a. Once the loop is in place, take the tag end of the fly line and pass it through the loop. b. Make a simple overhand knot to secure the connection. This knot should be tight enough to hold the float in place but not so tight that it restricts the float's movement.
Trim Excess Line: a. Trim any excess line from the tag end of the fly line. b. Make sure to leave enough line to form a good loop for future adjustments.
Testing the Setup: a. Cast the rig into the water and observe the float's movement. b. Adjust the position of the float if necessary to achieve the desired depth.
Illustrations:
To enhance understanding, the following illustrations provide a visual guide to each step of the process:
[Insert detailed illustrations here]
Conclusion:
Inserting a float into your fly line is a fundamental skill in fly fishing. By following these step-by-step instructions and referring to the provided illustrations, you'll be able to set up your line and float correctly, leading to more successful fishing trips. Remember, practice makes perfect, so don't hesitate to experiment and refine your technique over time. Happy fishing!